Intro to coordinate metrology
Understanding the CMM: The coordinate system.
Contact us
We use a coordinate system to describe the movements of a measuring machine. The coordinate system, invented by the famous French philosopher and mathematician René Descartes in the early 1600s, lets us locate features relative to other features on workpieces.
A coordinate system is a lot like an elevation map where the combination of a letter along one edge of the map, a number along the other, and elevations shown throughout uniquely describes each location on the map. This letter/number/elevation combination is called a coordinate and represents a specific place relative to all others.
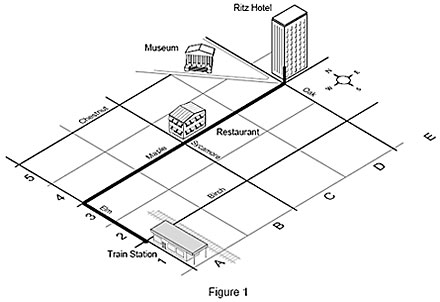
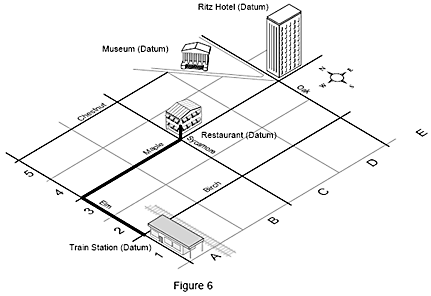
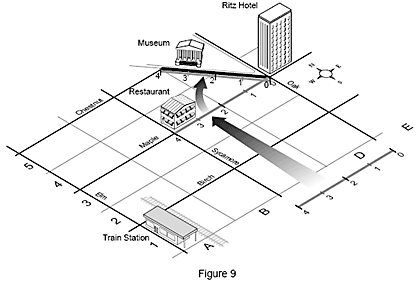
Another example is a street map with buildings shown. To walk to your hotel room at the Ritz Hotel from the train station (your origin), you walk 2 blocks along Elm street, 4 blocks on Maple and up 3 floors in the Ritz. This location can also be described by the coordinates 4-E-3 on the map, corresponding to the X, Y and Z axes on the machine. These coordinates uniquely describe your room and no other location on the map.
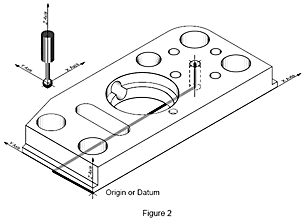
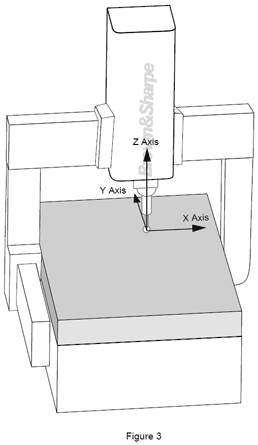
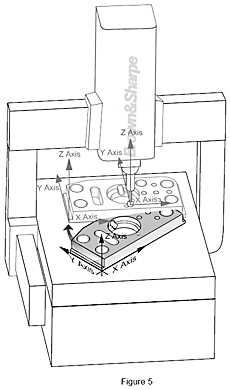
A coordinate measuring machine (CMM) works in much the same way as your finger when it traces map coordinates; its three axes form the machine's coordinate system. Instead of a finger, the CMM uses a probe to measure points on a workpiece. Each point on the workpiece is unique to the machine's coordinate system. The CMM combines the measured points to form a feature that can now be related to all other features.
The coordinate system: the Machine Coordinate System
The coordinate system: the Part Coordinate System
Before the introduction of computer software to coordinate measurement, parts were physically aligned parallel to the machine’s axes so that the Machine and Part Coordinate Systems were parallel to one another. This was very time consuming and not very accurate. When the part was round or contoured, rather than square or rectangular, the measurement task was nearly impossible.
The coordinate system: what is alignment?
With today's CMM software, the CMM measures the workpiece's datums (from the part print), establishes the Part Coordinate System, and mathematically relates it to the Machine Coordinate System.The process of relating the two coordinate systems is called alignment. With a street map, we do this automatically by turning the map so that it is parallel to street (datum) or to a compass direction (i.e., north). When we do this, we're actually locating ourselves to the "world's coordinate system."
.gif)
What is a datum?
For example, to get from the train station (origin) to the restaurant, you walk 2 blocks north on Elm Street (datum), take a right, and walk 2 blocks east on Maple (datum).
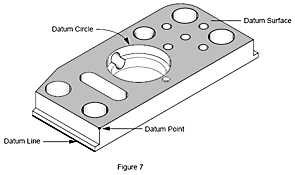
In metrology, a datum is a feature on a workpiece such as a hole, surface or slot. We measure a workpiece to determine the distance from one feature to another.
What is translation?
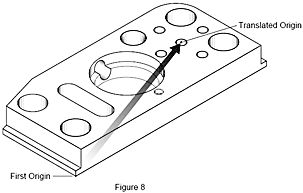
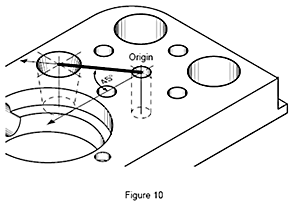
In terms of our street map, once you arrive at your hotel and decide to eat at a legendary restaurant on your visit to the city, you need to find it on the map. The hotel now becomes your new starting point, or origin. By knowing your location, you can tell by looking at the map that you will have to travel two blocks west along Maple Street to reach the restaurant.
What is rotation?
Measured and constructed features
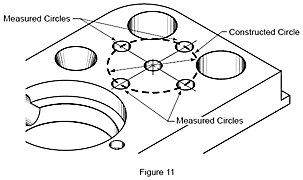
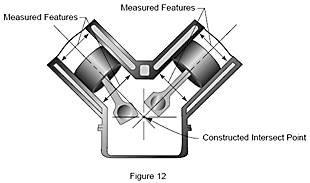
Other features, such as distance, symmetry, intersection, angle and projection, cannot be measured directly but must be constructed mathematically from measured features before their values can be determined. These are called constructed features. In Figure 11 the centerline circle is constructed from the center points of the four measured circles.
Constructed features
What is volumetric compensation?
Coordinate measuring machines are no different from other products in this respect. While they are built to extremely tight tolerances, there are errors (roll, pitch, yaw, straightness, squarenesses and scale errors) in their structure that affect their accuracy. As manufacturing tolerances become increasingly tighter, it is necessary for CMMs to become more accurate.
The majority of the CMM's inaccuracies can be corrected automatically in the CMM’s computer. Once all of the geometric errors of the CMM are measured (called error mapping), they can be minimized or even eliminated by powerful algorithms in the CMM's software. This technique is called volumetric error compensation.
By eliminating errors mathematically, you lower the cost of manufacturing and provide the customer more performance for their money.
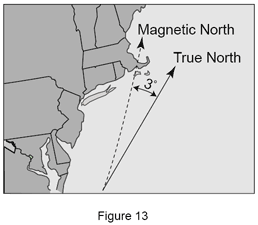
Volumetric compensation can be best understood in terms of the relationship between a map and a compass. If you want to sail to a particular location, you have to know its true direction from your current position (origin). A compass and a map are used to determine your direction, or bearing. There is, however, a difference between true north and magnetic north. The difference between the two is called variation and is caused by non-uniformity in the earth’s magnetic field. Thus, to determine the true direction from one point to another, the variation between true north and magnetic north must be added or subtracted from the compass bearing.
In the map shown, the difference between true north and magnetic north (3° W), must be compensated for or a sailor would end up northwest of the intended goal and would run aground before reaching the final destination.
A coordinate measuring machine does a similar compensation automatically to remove the variations of the machine from the measurement.
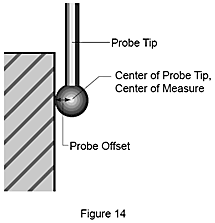
Qualifying probe tips probe compensation
Once the center and radius of the tip are known, when the probe contacts a workpiece, the coordinates of the tip are mathematically "offset" by the tip's radius to the tip's actual point of contact (Figure 14). The direction of the offset is automatically determined by the alignment procedure.
We do a similar procedure when we park a car. The better we can estimate our offset from the exterior of the car, the closer we can park it to the curb.
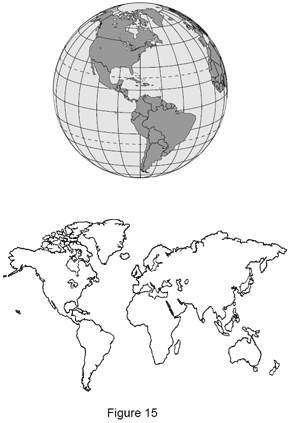
Projections
Projecting one part feature onto another can be compared with the creation of the traditional "flat" map of the world (Mercator projection). The flat map is made by projecting a globe of the world (sphere), onto a cylinder.
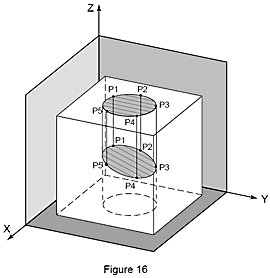
A minimum number of three points is necessary to measure the diameter of a circle and, if those points are not at the same distance from the top of the bore, the measured diameter will be shown to be elliptical. To overcome this misrepresentation, the measurement data is projected into a plane that is perpendicular to the centerline of the cylinder. The result is an accurate determination of the real size of this workpiece feature.
Using effective probe techniques
By using effective probe techniques when inspecting a workpiece, you can eliminate many common causes of measurement error.For example, probe measurements should be taken perpendicular to the workpiece surface whenever possible. Touch-trigger probes used on coordinate measuring machines are designed to give optimal results when the probe tip touches the workpiece perpendicular to the probe body. Ideally, you should take hits within ±20° of perpendicular to avoid skidding the probe tip. Skidding produces inconsistent, non-repeatable results.
Part surface to be probed
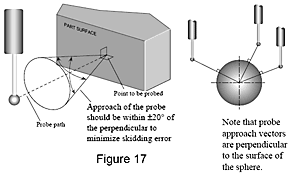
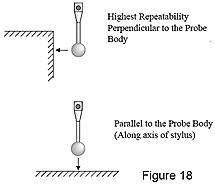
Using effective probe techniques
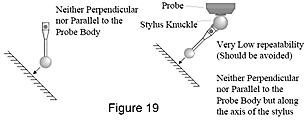
Shanking is another cause of measurement error (Figure 20). When the probe contacts the workpiece with the shank of the stylus and not the tip, the measuring system assumes the hit was taken in a normal manner and large errors will occur.
Using effective probe techniques
You can reduce the likelihood of shanking by using a larger diameter tip to increase the clearance between the ball/stem and the workpiece surface. Generally, the larger the tip diameter, the deeper the stylus can go before it touches the work piece feature. This is called the effective working length of the probe (Figure 21). Also, the larger the tip, the less effect it has on the surface finish of the workpiece since the contact point is spread over a larger area of feature being measured. However, the largest tip that can be used is limited by the size of the smallest holes to be measured.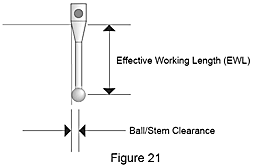
Geometric dimensioning and tolerancing
Geometric Dimensioning and Tolerancing (GD&T) is a universal language of symbols, much like the international system of road signs that advise drivers how to navigate the roads. GD&T symbols allow a design engineer to precisely and logically describe part features in a way they can be accurately manufactured and inspected. GD&T is expressed in the feature control frame. The feature control frame is like a basic sentence that can be read from left to right. For example, the feature control frame illustrated would read: The 5 mm square shape (1) is controlled with an all-around (2) profile tolerance (3) of 0.05 mm (4), in relationship to primary datum A (5) and secondary datum B (6). The shape and tolerance determine the limits of production variability.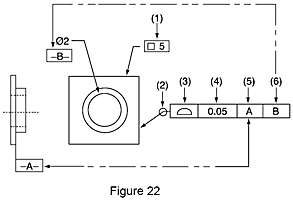
These geometric symbols are similar to the symbols used on maps to indicate features, such as two and four lane highways, bridges, and airports. They are like the new international road signs seen more frequently on U.S. highways. The purpose of these symbols is to form a common language that everyone can understand.
Geometric characteristic symbols
- Straightness — A condition where all points are in a straight line, the tolerance specified by a zone formed by two parallel lines.
- Flatness — All the points on a surface are in one plane, the tolerance specified by a zone formed by two parallel planes.
- Roundness or Circularity — All the points on a surface are in a circle. The tolerance is specified by a zone bounded by two concentric circles.
- Cylindricity — All the points of a surface of revolution are equidistant from a common axis. A cylindricity tolerance specifies a tolerance zone bounded by two concentric cylinders within which the surface must lie.
- Profile — A tolerancing method of controlling irregular surfaces, lines, arcs, or normal planes. Profiles can be applied to individual line elements or the entire surface of a part. The profile tolerance specifies a uniform boundary along the true profile within which the elements of the surface must lie.
- Angularity — The condition of a surface or axis at a specified angle (other than 90°) from a datum plane or axis. The tolerance zone is defined by two parallel planes at the specified basic angle from a datum plane or axis.
- Perpendicularity — The condition of a surface or axis at a right angle to a datum plane or axis. Perpendicularity tolerance specifies one of the following: a zone defined by two planes perpendicular to a datum plane or axis, or a zone defined by two parallel planes perpendicular to the datum axis.
- Parallelism — The condition of a surface or axis equidistant at all points from a datum plane or axis. Parallelism tolerance specifies one of the following: a zone defined by two planes or lines parallel to a datum plane or axis, or a cylindrical tolerance zone whose axis is parallel to a datum axis.
- Concentricity — The axes of all cross sectional elements of a surface of revolution are common to the axis of the datum feature. Concentricity tolerance specifies a cylindrical tolerance zone whose axis coincides with the datum axis.
- Position — A positional tolerance defines a zone in which the center axis or center plane is permitted to vary from true (theoretically exact) position. Basic dimensions establish the true position from datum features and between interrelated features. A positional tolerance is the total permissible variation in location of a feature about its exact location. For cylindrical features such as holes and outside diameters, the positional tolerance is generally the diameter of the tolerance zone in which the axis of the feature must lie. For features that are not round, such as slots and tabs, the positional tolerance is the total width of the tolerance zone in which the center plane of the feature must lie.
- Circular Runout — Provides control of circular elements of a surface. The tolerance is applied independently at any circular measuring position as the part is rotated 360 degrees. A circular runout tolerance applied to surfaces constructed around a datum axis controls cumulative variations of circularity and coaxiality. When applied to surfaces constructed at right angles to the datum axis, it controls circular elements of a plane
- Total Runout — Provides composite control of all surface elements. The tolerance applied simultaneously to circular and longitudinal elements as the part is rotated 360 degrees. Total runout controls cumulative variation of circularity, cylindricity, straightness, coaxiality, angularity, taper, and profile when it is applied to surfaces constructed around a datum axis. When it is applied to surfaces constructed at right angles to a datum axis, it controls cumulative variations of perpendicularity and flatness.
