More speed and more accuracy with laser tool setters
Modell- und Formenbau Schmidgall - Germany
Contact us

For years, model and mould construction has been measuring using probes and software by m&h. Now tools are also measured in the machine using m&h laser tool setters – with significant improvements in manufacturing.
This is where structural change becomes visible: Wüstenrot in the middle of the Swabian-Franconian Forest nature reserve: The Schmidgall company, a modern model and mould manufacturer with 16 employees and innovative machinery, operates at the former location of a cigar factory.
In this location, precision vacuum forming moulds, foam moulds and rotational moulds as well as milling fixtures and gauges are manufactured. These are primarily made of aluminium, but also from Ureol, cast iron, steel or a great variety of plastics and sometimes even from wood. Workpieces of up to 4,000 x 3,000 x 1,250 mm edge length are machined here. Its customers are primarily the automotive industry and its suppliers, racing sports, but also other areas, including even scientific institutions.
 Along with the machines, Schmidgall also used probes and tool setters from different manufacturers, resulting in a wide variety of application experiences. Together with a large five-axis machining centre from Zimmermann, the company invested in an m&h probe in 2008. Because of the large travel distances and the five-axis machine, signal transmission by radio signal was selected. The m&h radio wave touch probe operates with 64 freely selectable channels in the protected industrial radio bandwidth around 433 MHz. During the entire duty cycle of the machine, the receiver scans the radio channels and signals when external interference signals are received on a channel. This channel will then be locked for use with the probe to prevent false signals or unwanted machine downtimes. The signal strength of the m&h radio communication ensures secure and fast transmission to the control, even under unfavourable conditions, such as long distances in the machining area or from deep cavities in the workpieces. “Sometimes we have to plunge into deep forms.
The m&h probe works even in the farthest corner,” Manfred Schmidgall confirms.
The Schmidgall team appreciates the ease of maintenance and the much lower cost of the batteries for m&h probes compared to probes from other manufacturers. While models from other manufacturers require sometimes expensive special batteries, m&h probes always run on standard batteries which are available anywhere they are needed. Battery replacement can be carried out simply, quickly and without tools. The receiver also monitors the charge status of the batteries and signals in time that a battery change is recommended. In 2011, Schmidgall also introduced the 3D Form Inspect program by m&h. With this software, a target-actual comparison between CAD data and the actual workpiece can be performed within minutes. The data obtained reassure the machine operators and ensure quality control while the workpiece is still clamped in the machine. With a method patented by m&h, the probe is quickly calibrated in all the required setting angles, and the correction values are included in the evaluation. This ensures that thermal influences and loads of the machine are recorded and included in the measurements. This is the only way to achieve the same values as possibly later on a measuring machine. Thanks to this reliability, the moulds are milled without allowances at Schmidgall. Since customers often request a measurement report with their workpiece, Schmidgall can quickly and easily fulfil this desire as well without the need to use a measuring machine.
The advantages of the Best Fit software module are stressed in particular. With this module, the contours of a workpiece are probed at key points and their actual location is recorded in the clamping.
Then the software calculates the offset and rotation relative to the nominal values, allowing the adjustment of the processing software in the control according to the actual position of the workpiece. “With 3D Form Inspect we are twice as fast at casting workpieces,” Manfred Schmidgall is pleased to say. “We basically do the programming with 3D Form Inspect at the same time we do the set-up.” This otherwise very time-consuming adjustment is frequently required in the case of repairs and the machining of castings. With this, the Schmidgall team has had excellent experiences with moulds for bathtubs, for instance, or trim parts for the automotive industry and others. “We are much more accurate and faster with this software. The automatic adjustment helps to avoids mistakes,” Manfred Schmidgall says about his experience.
Schmidgall has also had many years of experience measuring tools on the machine. The team was not at all satisfied, however, and expensive repairs were unfortunately also necessary. So it made sense to try the laser tool setter by m&h, especially since these were supposed to be designed especially for the harsh environment in a machine tool as well as being reasonably priced.
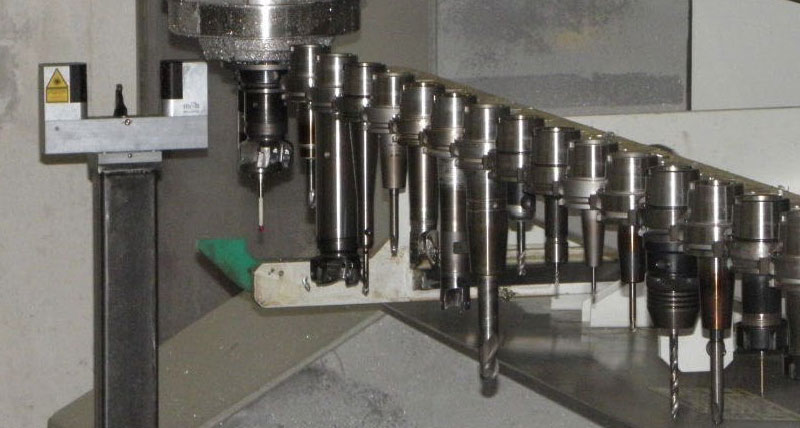
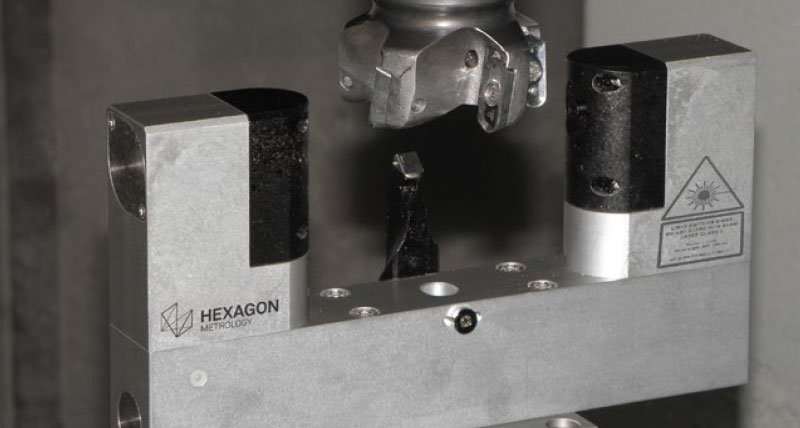
So the five-axis machining centre by Zimmermann was retrofitted with a laser tool setter by m&h. The LTS35.65 laser tool setter by m&h is now mounted on a stand at the very edge of the machining area and in close proximity to the tool changer; it mainly measures tool lengths and tool diameters in the work spindle and under the nominal rotational speed of the machining process. In this way, Schmidgall can not only forego a tool presetting device, but receives even more accurate results, because the respective clamping situation with the draw-in force of the spindle feed and the position in the clamping cone and thermal influences in the work spindle are included in the measurement. “We are faster and have a significantly reduced surface offset,” confirms Alexander Schulz, Technical Manager at Schmidgall.
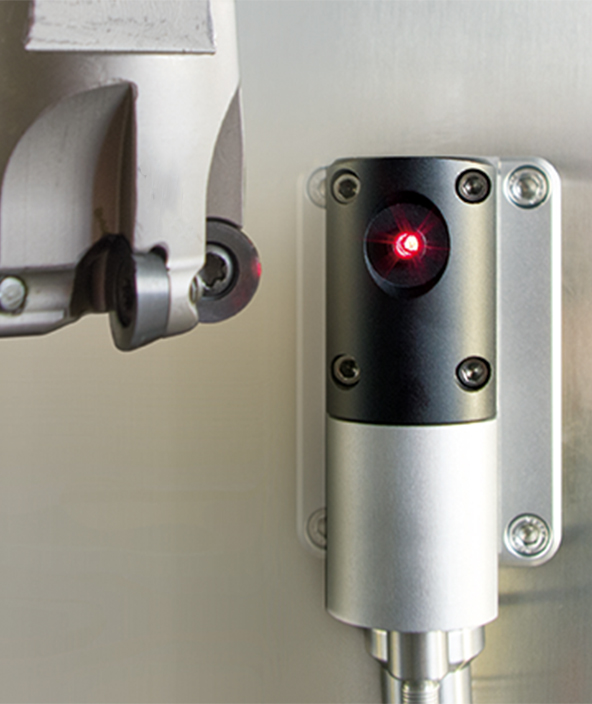
The blow-off device of the m&h Laser Tool Setter is particularly impressive. It consists of a so-called Laval nozzle as it was originally developed for space propulsion. In it, the air jet is not only directed, but also accelerated, which results in short-term supersonic speed in the centre of the airflow. This sharp beam is pointed directly at the focal point of the laser, thereby reliably blowing away adhering contaminants from by the tool. This ensures that it is the tool edge that is measured and not the dirt.
This is where structural change becomes visible: Wüstenrot in the middle of the Swabian-Franconian Forest nature reserve: The Schmidgall company, a modern model and mould manufacturer with 16 employees and innovative machinery, operates at the former location of a cigar factory.
In this location, precision vacuum forming moulds, foam moulds and rotational moulds as well as milling fixtures and gauges are manufactured. These are primarily made of aluminium, but also from Ureol, cast iron, steel or a great variety of plastics and sometimes even from wood. Workpieces of up to 4,000 x 3,000 x 1,250 mm edge length are machined here. Its customers are primarily the automotive industry and its suppliers, racing sports, but also other areas, including even scientific institutions.
 Along with the machines, Schmidgall also used probes and tool setters from different manufacturers, resulting in a wide variety of application experiences. Together with a large five-axis machining centre from Zimmermann, the company invested in an m&h probe in 2008. Because of the large travel distances and the five-axis machine, signal transmission by radio signal was selected. The m&h radio wave touch probe operates with 64 freely selectable channels in the protected industrial radio bandwidth around 433 MHz. During the entire duty cycle of the machine, the receiver scans the radio channels and signals when external interference signals are received on a channel. This channel will then be locked for use with the probe to prevent false signals or unwanted machine downtimes. The signal strength of the m&h radio communication ensures secure and fast transmission to the control, even under unfavourable conditions, such as long distances in the machining area or from deep cavities in the workpieces. “Sometimes we have to plunge into deep forms.
 The m&h probe works even in the farthest corner,” Manfred Schmidgall confirms.
The Schmidgall team appreciates the ease of maintenance and the much lower cost of the batteries for m&h probes compared to probes from other manufacturers. While models from other manufacturers require sometimes expensive special batteries, m&h probes always run on standard batteries which are available anywhere they are needed. Battery replacement can be carried out simply, quickly and without tools. The receiver also monitors the charge status of the batteries and signals in time that a battery change is recommended. In 2011, Schmidgall also introduced the 3D Form Inspect program by m&h. With this software, a target-actual comparison between CAD data and the actual workpiece can be performed within minutes. The data obtained reassure the machine operators and ensure quality control while the workpiece is still clamped in the machine. With a method patented by m&h, the probe is quickly calibrated in all the required setting angles, and the correction values are included in the evaluation. This ensures that thermal influences and loads of the machine are recorded and included in the measurements. This is the only way to achieve the same values as possibly later on a measuring machine. Thanks to this reliability, the moulds are milled without allowances at Schmidgall. Since customers often request a measurement report with their workpiece, Schmidgall can quickly and easily fulfil this desire as well without the need to use a measuring machine.
The advantages of the Best Fit software module are stressed in particular. With this module, the contours of a workpiece are probed at key points and their actual location is recorded in the clamping.
Then the software calculates the offset and rotation relative to the nominal values, allowing the adjustment of the processing software in the control according to the actual position of the workpiece. “With 3D Form Inspect we are twice as fast at casting workpieces,” Manfred Schmidgall is pleased to say. “We basically do the programming with 3D Form Inspect at the same time we do the set-up.” This otherwise very time-consuming adjustment is frequently required in the case of repairs and the machining of castings. With this, the Schmidgall team has had excellent experiences with moulds for bathtubs, for instance, or trim parts for the automotive industry and others. “We are much more accurate and faster with this software. The automatic adjustment helps to avoids mistakes,” Manfred Schmidgall says about his experience.
Schmidgall has also had many years of experience measuring tools on the machine. The team was not at all satisfied, however, and expensive repairs were unfortunately also necessary. So it made sense to try the laser tool setter by m&h, especially since these were supposed to be designed especially for the harsh environment in a machine tool as well as being reasonably priced.
So the five-axis machining centre by Zimmermann was retrofitted with a laser tool setter by m&h. The LTS35.65 laser tool setter by m&h is now mounted on a stand at the very edge of the machining area and in close proximity to the tool changer; it mainly measures tool lengths and tool diameters in the work spindle and under the nominal rotational speed of the machining process. In this way, Schmidgall can not only forego a tool presetting device, but receives even more accurate results, because the respective clamping situation with the draw-in force of the spindle feed and the position in the clamping cone and thermal influences in the work spindle are included in the measurement. “We are faster and have a significantly reduced surface offset,” confirms Alexander Schulz, Technical Manager at Schmidgall.
The blow-off device of the m&h Laser Tool Setter is particularly impressive. It consists of a so-called Laval nozzle as it was originally developed for space propulsion. In it, the air jet is not only directed, but also accelerated, which results in short-term supersonic speed in the centre of the airflow. This sharp beam is pointed directly at the focal point of the laser, thereby reliably blowing away adhering contaminants from by the tool. This ensures that it is the tool edge that is measured and not the dirt.
