Non-contact measurement at ALSTOM
3D Inspection: When every millimeter counts
Contact us

ALSTOM in Salzgitter, Germany, is one of the leading suppliers of complete railway solutions and delivers motor units, wagons and locomotives as well as state-of-the-art control and monitoring systems. In order to achieve a higher fitting accuracy in the production of front FRP (Fiber Reinforced Plastic) hoods and in car lining, Alstom makes use of the non-contact measurement system DPA from AICON. Alstom particularly appreciates the unlimited mobility of the system and its flexible application possibilities.
DPA - a universal problem solver
Alstom has not precisely defined the application areas of DPA. In fact the company uses the non-contact measurement system for various measurement tasks. ”And new tasks may appear continuously”, affirms Olaf Duden, FRP Quality Manager. However, all measurements in the plant have one common ground: They are executed on immovable, very large components.
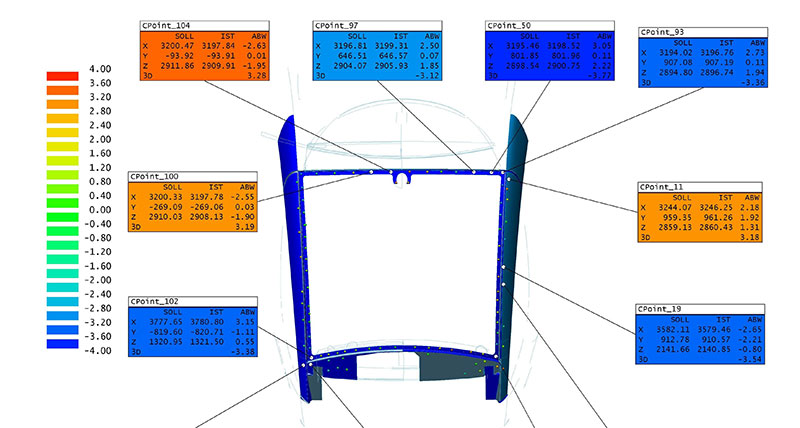
For example, Alstom compares the actual contour of the bow shutter of the front FRP hood which covers wiper and headlights with the actual contour of the windshield to be inserted. Thus the accuracy of gaps and splices can be assured before the components are assembled.
In order to detect possible sources of error, the measured data are compared with the CAD data. Inaccuracies with respect to the bow shutter are possible as it is manufactured manually. It consists of FRP, a very high-quality material. In its processing, a worker laminates single glas fiber mats with a certain resin in a tool form.
Likewise, Alstom makes use of DPA to measure tools and tool forms that are applied for the manufacturing of the front end side part. After the comparison with the CAD design data, the production site receives precise information about necessary corrections in a fast way.
Only with the application of DPA, the above described measurement tasks could be solved. Olaf Duden explains: “There is no alternative to DPA. Our components and tools are extremely immovable. As we cannot acquire a measurement system for each component, the measurement system has to come to the object, and not the other way round.“
DPA disposes of another outstanding feature: It is immediately ready for new measurement tasks without any preparation time. “The possibilities are inexhaustible“, says Duden. “As soon as the CAD data set is available, the measurement can start.“ Furthermore, Alstom uses the mobility of the system to conduct quality controls in the suppliers' plants.
Work flow with non-contact measurement system DPA
The positions to be checked, for example certain parts of the front end, are signalized with targets according to an acceptance report.
For this, Alstom uses paper targets the operator generates and prints with the help of the software module CodeMaker. Thus the costs for expendable items remain minimal. A general rule says that the number of measurement points of each single component depends on its complexity. The controlled parts of the component include structure, form and position of bore wholes and layers.
In the next step, the front FRP hood to be measured is photographed from a number of directions with a high resolution digital camera.
Subsequently, DPA automatically calculates 3D coordinates for measurement points with the help of a photogrammetric analysis. Then the system transfers these coordinates directly to the coordinate system of the work piece. In the CAD analysis software, the actual coordinates of the front end, already compensated with the thickness of the target material, are compared to the CAD shape.
In addition to the analysis of deviations of single points to the surface structure, also the actual positions of boreholes as well as orientation and evenness of push layers can be calculated and compared. The analysis is closed with the creation of significant reports which are generated automatically by DPA. Manual reports have become unnecessary.
Non-contact measurement system DPA guarantees constant measurement times
Although the measurement of big components requires more measurement images and points, the pure DPA measurement time remains absolutely constant. As consequently every non-contact measurement requires the same time frame, Alstom disposes of certain rules of thumb which enable them to estimate precisely the measurement time to be expected. This pays off in the long run because easurement tasks can be calculated easily.