Probing away set-up times
HAVLAT Präzisionstechnik – Germany
Contact us

Using Touch Probes and Software from M&H, Havlat in Zittau is able to significantly reduce set-up times and achieve secure, consistent manufacturing.
In Zittau, in the easternmost corner of Saxony, there is a real success story coming out of the old east Germany. In newly built production facilities, Havlat has established itself using state-of-the-art cutting techniques. Divided into various plants, they manufacture a variety of components that are partly assembled ready for installation.
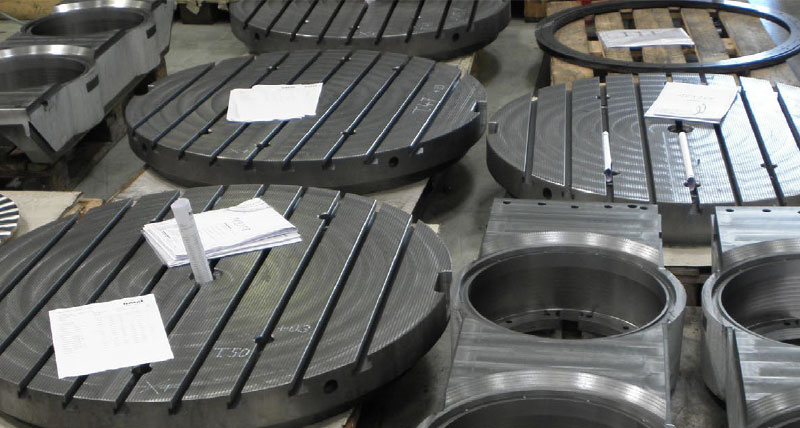
Havlat produce a varied range of components ranging from a few millimetres long to medium-sized parts such as blades for steam and gas turbines up to large casings for turbines or pre-mounted machine beds with working tables. They have capacity to turn diameters up to 5 metres, machine components weighing up to 45t, mill lengths up to 14 m and cylindrical grinding is possible for parts up to 1.6m. Machinery ranges from all sizes of turning and machining centres to large boring mills and vertical boring and turning mills.
German reunification in 1989 was the trigger for Havlat to accelerate their growth. Today the former tool and mould manufacturer is an impressive production company currently with 265 employees, 43 of whom are apprentices with good prospects of being offered permanent employment after completing their training.
Manufacturing very large workpieces creates problems significantly different to those found in the volume manufacturing of medium-sized parts. This begins with handling of workpieces and finishes with the task of measuring and recording machining results of workpieces. Setting up machines for such large workpieces takes several hours. Aligning workpieces is tedious. Long set-up times compromise both the productivity of individual machines and the capacity of the entire production facility.
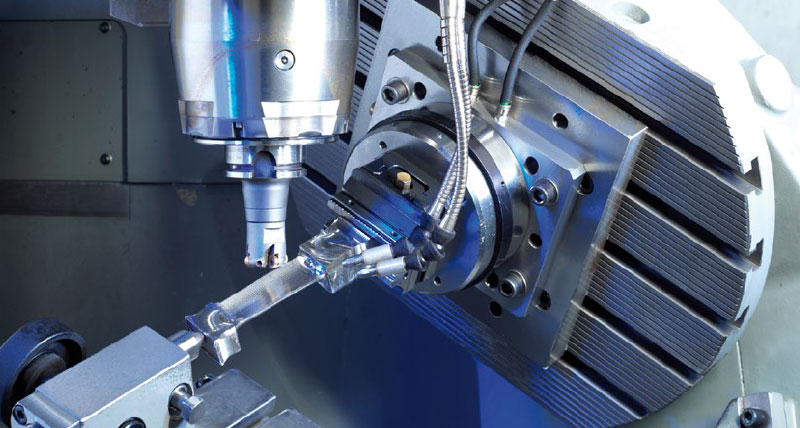
 At Havlat, large Alesa Monti boring machines have been equipped with m&h touch probes using radio data transmission. m&h radio transmission is based on radio technology using specific channels in the proven 433 MHz band. m&h radio-wave touch probes have 64 freely selectable channels allowing them to avoid same channel interference signals in a targeted way. More importantly, almost any number of machines can be operated in the immediate vicinity without interfering with each other. The high performance radio technology is recommended because of the long transmission distance inside these large machines. Also, inside 5-axis machines the touch probe must have a trouble-free measuring transmission to the control at all angular positions, even when deep inside workpieces. This is why the m&h radio receiver continuously checks all channels whenever the machine is on and automatically blocks all channels that receive significant interference signals.
When purchasing large boring machines, Havlat not only ordered them equipped with m&h touch probes but also purchased m&h’s 3D Form Inspect software. This software compares the data from the CAD drawing of the workpiece with actual values determined by the touch probe while the workpiece is still clamped on the machine. For this purpose, measuring points and functions are selected by mouse click from the graphic representation of the workpiece. The software creates the complete measuring program for the touch probe in the background while simultaneously checking whether these travel paths are collision free. The values determined are transmitted back to the computer and are immediately visible on screen. They can be printed out as a protocol or serve as a data set for subsequent machining. The measuring cycles are very helpful for determining the position of the workpiece but they are not sufficient to determine its actual true position. In order to shorten set-up times, Havlat has installed the supplementary m&h software module Best Fit. With the help of this module, the position of the workpiece in free space can be determined by means of important workpiece contours. The values determined are used to rotate the coordinate system and shift zero points in the machine control to bring the machining program in line with the actual position of the workpiece in the best optimum way. State-of-the-art Siemens 840D controls are capable of optimising these values without requiring workpieces to be in a predefined position or specially aligned. When using Best Fit, it is sufficient to only roughly clamp the workpieces in their intended position. This reduces set-up times by hours and enables manufacturing of workpieces within tolerance. This is particularly significant in the case of defor- mation such as on castings or after hardening.
Since workpieces often exceed the possible measuring distances or permissible weights of measuring machines, heavy or long components are measured and checked using 3D Form Inspect after machining while still clamped on the machine. Should any deviations occur, they can immediately be mechanically reworked, ensuring accuracy and allowing considerable time saving.
As with other companies, Havlat were initially sceptical whether a machine tool equipped with a touch probe would be able to deliver measured values similar to those obtained from a measuring machine. “The results are comparable to those from our Zeiss measuring machine,” Konrad Havlat is glad to report. Konrad Havlat is now asking that his QA managers check the possibility of more intensive use of touch probes on machines, giving priority to shortening set-up times. “This is where we can make the fastest use of the potential,” he states his main aim. “We do not have to think about straight line velocity on machines this size but we’re focussing on shorter set-up times and optimum usage. In so doing, we can keep track of the entire manufacturing process“
In Zittau, in the easternmost corner of Saxony, there is a real success story coming out of the old east Germany. In newly built production facilities, Havlat has established itself using state-of-the-art cutting techniques. Divided into various plants, they manufacture a variety of components that are partly assembled ready for installation.
Havlat produce a varied range of components ranging from a few millimetres long to medium-sized parts such as blades for steam and gas turbines up to large casings for turbines or pre-mounted machine beds with working tables. They have capacity to turn diameters up to 5 metres, machine components weighing up to 45t, mill lengths up to 14 m and cylindrical grinding is possible for parts up to 1.6m. Machinery ranges from all sizes of turning and machining centres to large boring mills and vertical boring and turning mills.
German reunification in 1989 was the trigger for Havlat to accelerate their growth. Today the former tool and mould manufacturer is an impressive production company currently with 265 employees, 43 of whom are apprentices with good prospects of being offered permanent employment after completing their training.
Manufacturing very large workpieces creates problems significantly different to those found in the volume manufacturing of medium-sized parts. This begins with handling of workpieces and finishes with the task of measuring and recording machining results of workpieces. Setting up machines for such large workpieces takes several hours. Aligning workpieces is tedious. Long set-up times compromise both the productivity of individual machines and the capacity of the entire production facility.
 At Havlat, large Alesa Monti boring machines have been equipped with m&h touch probes using radio data transmission. m&h radio transmission is based on radio technology using specific channels in the proven 433 MHz band. m&h radio-wave touch probes have 64 freely selectable channels allowing them to avoid same channel interference signals in a targeted way. More importantly, almost any number of machines can be operated in the immediate vicinity without interfering with each other. The high performance radio technology is recommended because of the long transmission distance inside these large machines. Also, inside 5-axis machines the touch probe must have a trouble-free measuring transmission to the control at all angular positions, even when deep inside workpieces. This is why the m&h radio receiver continuously checks all channels whenever the machine is on and automatically blocks all channels that receive significant interference signals.
When purchasing large boring machines, Havlat not only ordered them equipped with m&h touch probes but also purchased m&h’s 3D Form Inspect software. This software compares the data from the CAD drawing of the workpiece with actual values determined by the touch probe while the workpiece is still clamped on the machine. For this purpose, measuring points and functions are selected by mouse click from the graphic representation of the workpiece. The software creates the complete measuring program for the touch probe in the background while simultaneously checking whether these travel paths are collision free. The values determined are transmitted back to the computer and are immediately visible on screen. They can be printed out as a protocol or serve as a data set for subsequent machining. The measuring cycles are very helpful for determining the position of the workpiece but they are not sufficient to determine its actual true position. In order to shorten set-up times, Havlat has installed the supplementary m&h software module Best Fit. With the help of this module, the position of the workpiece in free space can be determined by means of important workpiece contours. The values determined are used to rotate the coordinate system and shift zero points in the machine control to bring the machining program in line with the actual position of the workpiece in the best optimum way. State-of-the-art Siemens 840D controls are capable of optimising these values without requiring workpieces to be in a predefined position or specially aligned. When using Best Fit, it is sufficient to only roughly clamp the workpieces in their intended position. This reduces set-up times by hours and enables manufacturing of workpieces within tolerance. This is particularly significant in the case of defor- mation such as on castings or after hardening.
Since workpieces often exceed the possible measuring distances or permissible weights of measuring machines, heavy or long components are measured and checked using 3D Form Inspect after machining while still clamped on the machine. Should any deviations occur, they can immediately be mechanically reworked, ensuring accuracy and allowing considerable time saving.
As with other companies, Havlat were initially sceptical whether a machine tool equipped with a touch probe would be able to deliver measured values similar to those obtained from a measuring machine. “The results are comparable to those from our Zeiss measuring machine,” Konrad Havlat is glad to report. Konrad Havlat is now asking that his QA managers check the possibility of more intensive use of touch probes on machines, giving priority to shortening set-up times. “This is where we can make the fastest use of the potential,” he states his main aim. “We do not have to think about straight line velocity on machines this size but we’re focussing on shorter set-up times and optimum usage. In so doing, we can keep track of the entire manufacturing process“
