Enhanced roadworthiness
Wiener Linien - Austria
Contact us

“Wiener Linien” is the public transport company running the trams of Vienna and they’re involved in extensive track and vehicle construction too. Components of all descriptions are repaired or replaced and also manufactured from new. The necessary precision and documentation is ensured by measuring on the machine tool using touch probes and 3D
Form Inspect software from m&h.Components varying from palm size up to 15 meters make up the multi-faceted range of workpieces being machined in the workshops of the track superstructure department of “Wiener Linien”, the public transport company for buses and trams in Vienna.
Track superstructure means all track elements and switches between the ground and the tram itself.
Measuring the accuracy of workpiece shapes plus bore alignments took a lot of time and frequently required special gauges. Also, in order to achieve roadworthiness, meticulous documentation of every workpiece before installation is necessary. Another extenuating factor was that not all employees in these business units were trained metal craftsmen. Also semi-skilled workers are employed, occasionally making decisions during night shifts. “You can’t make an omelette without breaking eggs – errors can occur,” Karl Borek the team leader in charge reports his experience. “Especially during the night shift, things went wrong on several occasions.”
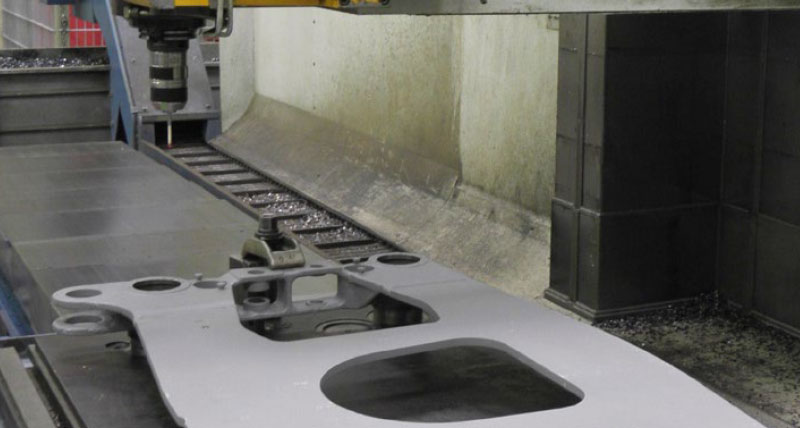
 As one machine had been equipped with an m&h touch probe, it made sense to look around for possibilities to use measuring on the machine. The crucial points were easy handling and high process reliability with complete documentation of all measuring results. m&h 3D Form Inspect software is capable of fulfilling all of these requirements after the operator has selected the points and measuring functions on a graphic representation of the CAD-constructed workpiece using only a few mouse clicks. The software auto- matically creates the touch probing program for the machine and simultaneously checks if there is any collision risk with the workpiece.
Also automatically, the measuring program is preceded by a brief calibration cycle on a ceramic ball inside the machine working area to register all current thermal and kinematic influences and include them in the measuring values. Within a few minutes the results are available both as a graphic on-screen representation and also as a proto- col that can be printed in various formats and included in all documentation.
The operator can see at a glance if the measuring points are within given tolerances or not. If there is any doubt, he can react immediately and repeat the machining process with appropriate tools, modified programs or rework if necessary. “In the past, a technical drawing formed the basis for our work,” Karl Borek describes the procedure. “Functions, angles and the like were calculated by means of a pocket calculator and then measured manually. This was very time-consuming. The measured values were written on slips of paper and transmitted afterwards but this was quite an error-prone approach. Today it is all done by the program and results are immediately documented. ” The m&h software is used by all employees on all shifts. Handling is so simple that the introduction on site took just one day.
With one licence of m&h3D Form Inspect software installed on the computer in the foreman’s office, currently two machines from Kekeisen and Alzmetall with different Heidenhain controls are covered. Whilst the smaller machining centre is equipped with an m&h touch probe with infrared transmission, the larger machine is equipped with a probe using radio-wave transmission. Mr Borek praises the problem-free handling of m&h probes: “It’s child’s play,” he reports. Moreover, he can only praise the service from m&h and, in case of emergency, the quick dispatch of hired probes: “There’s always a friendly contact and things proceed quickly and smoothly”. This is a very important aspect of production operations since lead times are too short to wait if anything goes wrong.
To make better use of machining centre capacity they have taken on work from other business units. The vehicle construction department, where new vehicles are built and operational trams are maintained and updated to service schedules, is particularly glad of the new possibilities their colleagues at the track superstructure department have at hand. Now more and more components are machined, measured and documented on the machines in one operation.
A portal bridge called a “transverse bracing” is used in the undercarriages of the state-of-the-art low-floor vehicles at Wiener Linien. Superseding the customary bogies, this process has become the prime operation during vehicle servicing. The transverse bracing is heavily stressed both statically and dynamically during operation. It is dismantled during every general inspection and loaded onto the machine tool where key features are measured to check for distortion and wear. Based on these results, the decision is taken whether or not rema-chining is necessary or if the part needs to be exchanged. “This way we are able to simplify revision work and reduce the time needed, ” Karl Borek reports. “On a practical level, the measuring protocol is seen by the people in charge at the push of a button. They can im-mediately decide what has to be done.”
In summary, team leader Karl Borek is extremely positive. “Our process has been simplified to such an extent that it’s difficult to put into words” he explains. “On our main workpiece we have saved at least 50% of the process time per workpiece! At the same time we have an error-free and much improved documentation.” As well as process reliability he is pleased with the repeatability that has been considerably enhanced. “Now we really measure the same points every time. We were never certain about that before.”
The introduction of the m&h software has not only cut the process time in half but also resulted in a considerable enhancement of process safety. Increased productivity helps the business units to take over new tasks and safeguard jobs. The enhanced possibilities result in more intensive use of the machines, particularly by other business units. Thanks to the automatically generated documentation of the workpieces, measuring on the machine tool also makes a contribution to the roadworthiness of the vehicles.
The introduction of the m&h software has not only cut the process time in half but also resulted in a considerable enhancement of process safety. Increased productivity helps the business units to take over new tasks and safeguard jobs. The enhanced possibilities result in more intensive use of the machines, particularly by other business units. Thanks to the automatically generated documentation of the workpieces, measuring on the machine tool also makes a contribution to the roadworthiness of the vehicles.


